Editor - Foliage
Object List
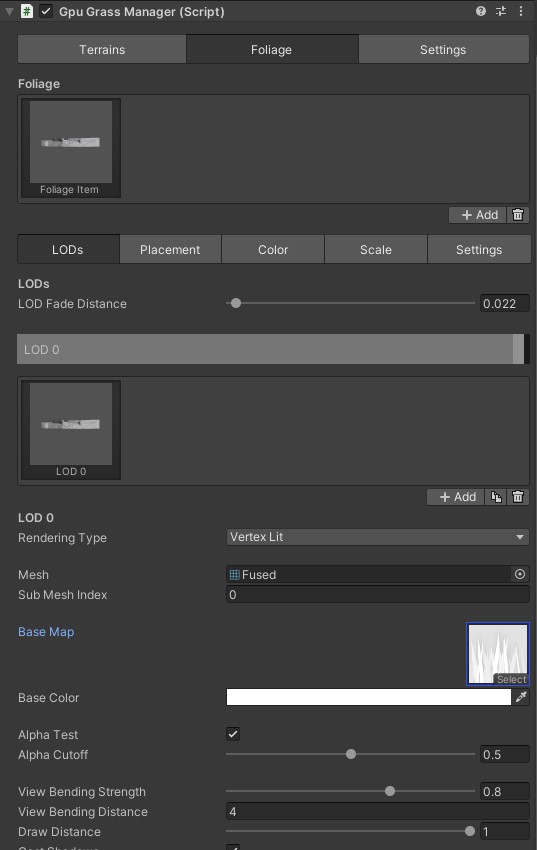
List of objects that GPU Grass will render. Select one to see it's settings below.
- Add
- Remove
LODs Tab
If you have multiple LODs GPU Grass will fade between them based on distance to camera. You can have one, two or three LOD levels.
-
LOD Fade Distance - LODs can fade between each other and fade out at maximum draw distance. This changes the distance of the fading. Set to 0 to disable fading. Screen space dithering is used to fade.
-
LOD Distance Visualizer - This is a visual representation of your LOD levels and their draw and fade distances.
-
LOD List
List of your LOD meshes.
- Add
- Duplicate
- Remove
-
Rendering Type - Either vertex or pixel lit. Vertex lit is faster as lighting is only calculated for each vertex rendered. Pixel lit is more accurate.
-
Mesh - Mesh to render.
-
Sub Mesh Index - Sub-mesh index to render. If your mesh includes multiple meshes then you can select which one to render here. 0 renders the first mesh.
-
Base Map - Base color and transparency map.
-
Base Color - Color that is multiplied with base color map.
-
Alpha Test - Alpha test is turns pixels on/off based on the base map's alpha channel. It is faster than true transparency and does not have depth sorting issues.
-
Alpha Cutoff - Colors below this value in the base map's alpha channel will not be rendered.
-
View Bending
View bending can bend grass or objects away from the camera. This is great for top-down games or first/third person games where the player can look down at the ground.
-
View Bending Strength - The amount that objects will be bent. Set to 0 to disable view bending.
-
View Bending Distance - Max distance that view bending will happen. For a top-down game set to a high number. For a first or third person game this should probably be set to a few feet away from the camera.
-
-
Draw Distance - The maximum distance that this LOD will be visible at. This is a percentage of "Draw Distance" in the settings tab.
-
Cast Shadows - Toggle on/off casting of shadows. This greatly affects performance. Disabling cast shadows on higher LODs is recommended.
How Modifiers Work
Objects are placed and rendered based on texture masks. Modifiers are how you change the texture masks. For example you can add a terrain slope modifier that does not render objects on steep terrain. This of modifiers as layers in Photoshop. They are combined to create one texture mask.
- Terrain Slope - Slope or angle of the terrain. 0 is flat terrain and 1 is 90 degrees.
- Noise - Simplex, perlin, celluar f1 or celluar f2 noise. This uses Unity's mathematics random package.
- Terrain Height - Height of terrain.
- Terrain Layer - Terrain layer.
- Random - Randomness using Unity's mathematics random package.
- Texture - A grayscale texture that you provide.
Modifiers can be combined by setting the blend mode. These work the same way as blending modes in Photoshop.
- Multiply
- Darken
- Lighten
- Overlay
- Screen
- Soft Light
- Hue
- Saturation
- Lightness
Placement Tab
-
Placement Settings
-
Placement Type
-
Blue Noise - Use blue noise for things like grass where you want a lot of evenly spaced objects. If you're using a high density blue noise will look fuller with less objects and be more performant.
-
Random - Use random for objects like bushes where you want them to be randomly placed. Objects that are randomly places have a higher change of spawning inside each other.
-
-
Density - Higher number creates more objects. A very low number may cause issues. Higher numbers greatly reduce performance. Use the lowest number that you are happy with. Setting a number that is too high may cause a stall which crashes Unity.
-
Y Offset - Translates the objects up or down. Set to a negative number to bury the base of objects in the terrain.
-
Thin Over Distance - Render less objects at far away distances. Set to 0 to render the same amount of objects up close as far away. Increase this number to make some objects fade out earlier. This Over Distance is useful for things like grass where you want a lot up close but there can be less far away.
-
Align to Ground - Align the mesh to the terrain slope. This will not rotate the mesh but instead moves the vertices up/down based on the terrain height. Use for things like grass but not for things like rocks.
-
-
Use Placement Settings from Another Foliage - If you have two meshes that you want to have the same settings you can use this so that their settings will match. For example if you want to render a tree that has two meshes, a trunk mesh and a leaves mesh then you can use this setting to render them with the same settings.
-
Placement Modifiers - Placement modifiers create a black and white mask that is used to limit where objects are placed. See the modifiers section above for more info.
Color Tab
- Color Settings
- Default Color - Base color. Think of it as the bottom layer in photoshop.
- Blend with Ground - Apply the terrain's color to the bottom of objects.
- Use Placement Settings from Another Foliage - If you have two meshes that you want to have the same settings you can use this so that their settings will match. For example if you want to render a tree that has two meshes, a trunk mesh and a leaves mesh then you can use this setting to render them with the same settings.
- Color Modifiers - Color modifiers create a texture map that is applied to objects by multiplying it with object's texture and base color.
Scale Tab
- Scale Settings
- XZ Scale Range - Scale range for the x and z axis of objects. How wide should objects be.
- Y Scale Range - Scale range for the y axis of objects. How tall should objects be.
- Use Placement Settings from Another Foliage - If you have two meshes that you want to have the same settings you can use this so that their settings will match. For example if you want to render a tree that has two meshes, a trunk mesh and a leaves mesh then you can use this setting to render them with the same settings.
- Scale Modifiers - Scale modifiers create a grayscale map that defines the scale of objects. They use this map to lerp between the scale ranges above.
Settings Tab
-
Enabled - Turn object on/off. This will disable rendering of the object. If you delete the object it will be slightly faster than disabling it.
-
Name - Name of object. Can be whatever you want.
-
Specular
- Specular Strength - Strength of specular lighting.
- Environment Strength - Strength of environment lighting.
- Smoothness - Smoothness of object.
-
Translucency
- Strength - Amount of translucency.
- Environment Strength - Strength of environment contribution.
- Scattering Strength - Width of translucency.
- Sub-Surface Color - Translucency color.
-
Draw Distance - Maximum draw distance for object. This is a multiplier of draw distance in manager settings.
-
Wind - Amount of wind on object.
-
Shape Normals Type
Normal to use when calculating lighting.
- Use Terrain Normal - Use the terrain's normal for the vert normals.
- Use Object Normal - Use vertex normals.
- Away from Pivot - Use vertex position minus pivot position for normal.
- Up - Use a normal pointing straight up for all of the vert normals.
- Vertex Colors - Use vertex colors for vert normals. Red=X, Green=Y, Blue=Z.